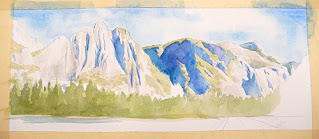
Watercolor Demo: Landscape of Yosemite
 |
| Yosemite Landscape in Watercolor |
In this demonstration, I am going to show you some of the principles of watercolor and landscape painting. First, in watercolor, always start with lighter colors on your painting, because of the nature of watercolor, you can easily cover a light color with a darker color to create more depth. Second, in landscape painting, having atmospheric perspective, we generally will have lighter backgrounds and darker foregrounds.
Based on these two principles, we are going to start with background mountains first and then the foreground trees.
1. Start with the sketch.
Use the masking tape to tape around the page and draw out the sketch. It is a good idea that to draw the shadow of the mountains and lightly mark where the trees are so that later, when you color, you won’t get too confused.
2. Paint the sky using wet in wet technique.
Wet the sky part carefully with clean water, and start painting the sky with blue. Make sure that the top of the sky is darker than the bottom.
3. First layer of the mountains.
Use warm gray to suggest the texture of the light side of the mountains.
Close-up image: follow the direction of the shapes in the mountains to paint the strokes.
4. A layer of vegetation.
Paint a layer of light greens on the mountains. Make sure to have some varieties of your greens to suggest different types of vegetation.
In the close-up image, as you can see, in some areas the green is a little redder.
5. Shadows of the mountains.
Same as the last step, try to have different hues and values of blues. Remember that based on atmosphere perspective, the further away the mountains are the lighter in value and less saturated they are. You can notice the mountain at the far right is lighter than the others.
6. Trees in the middle-ground.
Paint these trees with greens that are darker and more saturated than those on the mountains to create a sense of depth. After the first layer dries, paint the form shadows of those trees.
Tips for the trees: make them in different heights to look more natural.
7.Trees in the foreground.
After the last step dries, use black by mixing complementary colors to paint the foreground trees on the right side of the painting.
8. Trees on the left of the foreground.
Wet the area with clean water, and while it is still wet, paint the trees at the left.
After it all dries, paint the snow and the road.
9. Paint the tree trunks and branches.
Use detail brushes to paint the branches and tree trunks with black (by mixing complementary colors).
10. Another layer of the trees and the foreground.
Use a darker color to paint over the trees at the left to create depth within the trees, and use a greenish-black to finish the ground.
Working light to dark makes it easier to paint in watercolor and helps with creating atmospheric perspective. Notice how the mountains are much lighter than the trees. This gives the viewer a sense of space between the foreground and the background.


