If we draw simple or basic forms to set up the underlying structure of our drawings, we need to make sure that we can draw those forms accurately. In this lesson, we'll look at drawing a box. More accurately, we'll learn to identify the critical elements that go into creating a precisely shaped box.
Drawing a Box
We will, first, do a quick walk through some steps to draw a box. The steps below are not the only way to draw a box. However, if you have never drawn a box before, these steps set a simple process that makes drawing a box easier to do.
3. Now we draw the lines to illustrate the top edges of the front of our box. We want to roughly match the angle or the direction the lines are pointing for the lines of the top edges to the angles or direction the lines are pointing to the lines we drew representing the bottom edges.
4. Finally, draw the lines illustrating the back edges of the top of the box. Again, we match the angles in which we draw these lines to some other edges of our box. This time, we match the angle of the line representing the back edge to roughly match the angle of the opposite side of the front edge of the box.
We do not necessarily need to draw a box exactly matching these steps. We can mix up the order in which we draw each line to suit our needs. For example, we can draw all the edges of one side of the box before moving on to the next side.
However, these steps help us evaluate the box at each step to make sure that we avoid some common errors. These errors are all distortions in perspective or distortions in how we should see the box should from a particular point of view.
Common Problems
These distortions are usually caused by a line being placed in an incorrect location. When we do this, we make the box's surface appear out of place or warped.
Below, we can see three different common errors. All three of these examples do not consider the relationships between the edges and corners of the box. Each creates a different-looking distortion, but the underlying problem is the same. The problem is that the lines representing the edges do not line up according to the perspective guides.
You may have heard about 1-point and 2-point perspectives. These are both perspective guides. These guides assist us in drawing realistically by helping us create the illusion of depth accurately by establishing a set of guides that organize how we draw to match what we see. We use these guides to help us draw something that appears three-dimensional on a two-dimensional surface.
All the things we look at next are related to how we view three-dimensional s and connected to those guidelines.
Some Guidelines
The Side Edges of the Box
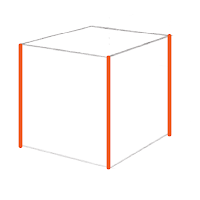
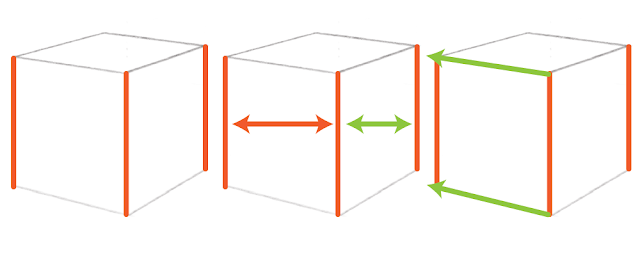
These three lines should be parallel to each other. We keep these three lines parallel because the width of each side of a generalized box is the same at the top and the bottom. As we are drawing a box sitting on a flat surface, we need to draw the edges to have equal widths at the top and bottom of each side of our box in our drawing.
We also need to pay attention to the spacing between those lines. The distance between each helps us set up the widths of each side as viewed from the angle that we see the box. It is the combination of the distance between these lines and the direction in which we draw the top and bottom lines that we illustrate how the width of each side of the box.
Setting up the Perspective of the Box
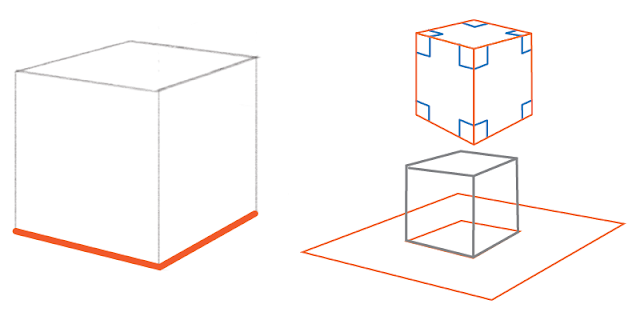
One thing to remember is that the sides of the box are rectangular and square shapes. Both these shapes have right-angled corners. We need to draw the lines to give the appearance of a rectangle or square as seen from the side. To put it another way, we draw each line in a direction or at an angle needed to suggest a structure made of right angles as seen in perspective.
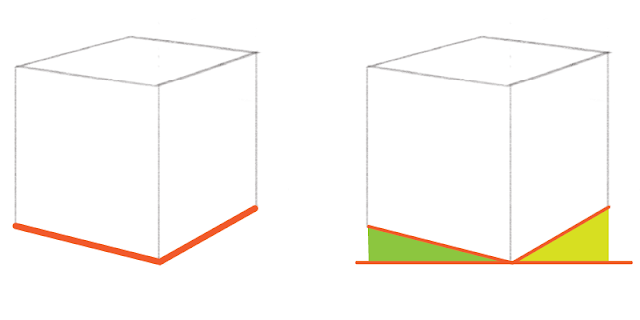
When paying attention to the angle we draw each line, we need to draw the line for the side of the box pointing more directly at us or facing us at a flatter angle compared to the angle of the line for the side of the box that indirectly faces us.
It is that angle that tells the viewer how much a surface is moving away from us. The more dramatic that angle, the closer to being perpendicular to our line of sight that surface is.
Lining up the Edges
We draw top edges close to parallel to the bottom edges to suggest that the square or rectangular shapes of the side of the box.
If we saw the side of the box facing directly towards us, the top and bottom edges would be parallel. When the side is not facing us directly, the lines are not exactly parallel. The two lines pinch in as they move towards the back edge.
To examine the reason for this, we need to look at one of the perspective guidelines.
When objects are closer to use, they appear larger. When they are further away, they appear smaller.
When we see two things of the same size at different distances, the one further away will appear smaller.
We experience the same things when looking at the parts of anything we see. The parts of something that are further away from us will appear smaller than those closer to us.
For example, if we saw someone pointing one hand towards us and the other away from us. The hand that is closer to us will appear larger than the hand that is further away. We know that both hands are the same size. Yet, because of the distance between the two hands, they appear to be different sizes.
This concept applies to our box as well.
We know that the front and back sides of our box are the same size. However, if we could see the back surface from the view we are drawing our box, the backside would appear smaller.
The two front sides of the box are also different sizes, depending on the distance the part of the side is away from us. The front edge of each side will be larger or longer than the trailing edge of that side.
Because these parts appear smaller as they move away from us, we need to pinch those parallel lines representing the top and bottom edges towards the back of the box. By doing this, we adjust to the smaller appearance of the backside and edges of the box. We can then connect the front of the box to the back more accurately.
We apply the same concept to the back edges of the top of the box. We draw the lines to loosely match the back edges of the top to the front edges.
The lines need to be roughly parallel, with a slight pinch between the two moving towards the back of the box. Again, we do this because, when seen from a side view, the back edge of the top of the box appears smaller than the front edge.
__
To better understand how to draw a box accurately, we need to practice. As we practice, we will refine our understanding of the shapes of a box and improve the look of our boxes.
I encourage you to draw a bunch of boxes of different sizes and shapes. Draw those boxes as seen from many different viewpoints or angles.
When practicing drawing boxes, practice sizing the sides of the box to create the box shape you want to draw. At the same time, practice drawing the angles of the edges of the box or the directions of the lines to show a three-dimensional box correctly.
Drawing boxes accurately can take time to get right. Eventually, you will be able to draw a solid-looking box without much effort.


